Save to Pinterest
 My sister called me three weeks before Mother's Day in a panic—she'd promised Mom a homemade cake but had never actually baked a layer cake before. I walked her through making this one over video chat, and watching her carefully pipe those pink ombre swirls while our mom napped in the next room felt like the whole point of the holiday. The kitchen filled with vanilla steam, her confidence grew with each layer, and by the time she placed those delicate edible flowers on top, I could hear the joy in her voice.
A friend brought this cake to a garden brunch last summer, and I watched three different people ask for the recipe before the first slice was even plated. What struck me was how she casually mentioned the flowers came from her own garden—suddenly it felt personal, like a gift wrapped in buttercream instead of paper. That's when I realized this cake isn't just dessert; it's a way of saying you actually tried.
Ingredients
- All-purpose flour: The foundation of a tender crumb; make sure yours is fresh and store it in a cool, dry place to avoid dense cakes.
- Unsalted butter (two portions): Room temperature is non-negotiable here—cold butter won't cream properly, and you'll end up with a grainy texture instead of that cloud-like softness.
- Granulated sugar: This dissolves into the butter and creates lift; don't skip creaming these together long enough or your cake will sink in the middle.
- Large eggs: Also room temperature, because they incorporate smoothly and create structure that holds all those layers upright.
- Pure vanilla extract: The backbone of flavor; use the real stuff, not imitation, because it makes a noticeable difference in a simple cake like this.
- Whole milk: Bring it to room temperature too—it'll blend seamlessly into the batter without shocking the warm butter mixture.
- Powdered sugar (sifted): Sift it before measuring to avoid lumps in your buttercream; this step is worth the extra thirty seconds.
- Gel food coloring: This is the secret to those gorgeous ombre shades without watering down your buttercream the way liquid coloring would.
- Edible flowers: Pansies, violas, and rose petals work beautifully; buy them from specialty grocers or grow your own pesticide-free blooms.
Tired of Takeout? 🥡
Get 10 meals you can make faster than delivery arrives. Seriously.
One email. No spam. Unsubscribe anytime.
Instructions
- Prepare your pans and preheat:
- Set your oven to 350°F (175°C) and get three 8-inch round pans greased and lined with parchment paper so the cakes slide out easily. This small step prevents disasters and lets you focus on mixing.
- Mix the dry ingredients:
- Whisk together flour, baking powder, and salt in a medium bowl to distribute the leavening evenly. Set this aside; you'll alternate it with milk in the next steps.
- Cream butter and sugar until fluffy:
- Beat them together on high speed for 3 to 4 minutes until the mixture turns pale and looks almost mousse-like. This incorporates air, which is what makes the cake rise and stay tender.
- Add eggs one at a time:
- Drop in each egg and beat well before adding the next; this prevents the batter from looking curdled. Add your vanilla extract here too.
- Alternate flour and milk:
- Add one-third of the flour mixture, then some milk, then more flour, always starting and ending with flour so the batter stays cohesive. Overmixing at this point will toughen the crumb, so stir just until combined.
- Divide and bake:
- Divide batter evenly among the three pans and bake for 25 to 30 minutes until a toothpick comes out clean. The kitchen will smell incredible, and your cakes should rise evenly with golden tops.
- Cool with patience:
- Let the cakes rest in the pans for 10 minutes, then turn them out onto cooling racks to cool completely. Frosting warm cake is a shortcut that never works out well.
- Beat the buttercream until silky:
- Cream your room-temperature butter for 2 to 3 minutes until it looks pale, then gradually add sifted powdered sugar so you don't create a cloud of sugar dust. Add milk and vanilla, then beat on high for another 3 minutes to fluff it up.
- Create the ombre effect:
- Divide the buttercream into four bowls and tint three of them with increasing amounts of pink gel coloring—think barely blushed, sunset pink, and bold rose. The white bowl stays untouched for spreading on the sides.
- Stack and frost with intention:
- Place your first cake layer on a plate, spread the darkest pink buttercream on top, add the next layer with medium pink, then the final layer with light pink on top. Use the white buttercream for the sides, blending gently with an offset spatula so the ombre flows from dark to light.
- Decorate and chill:
- Place edible flowers on top, then refrigerate the cake for 30 minutes so the buttercream sets and your slices come out clean. This is also when you can admire your work.
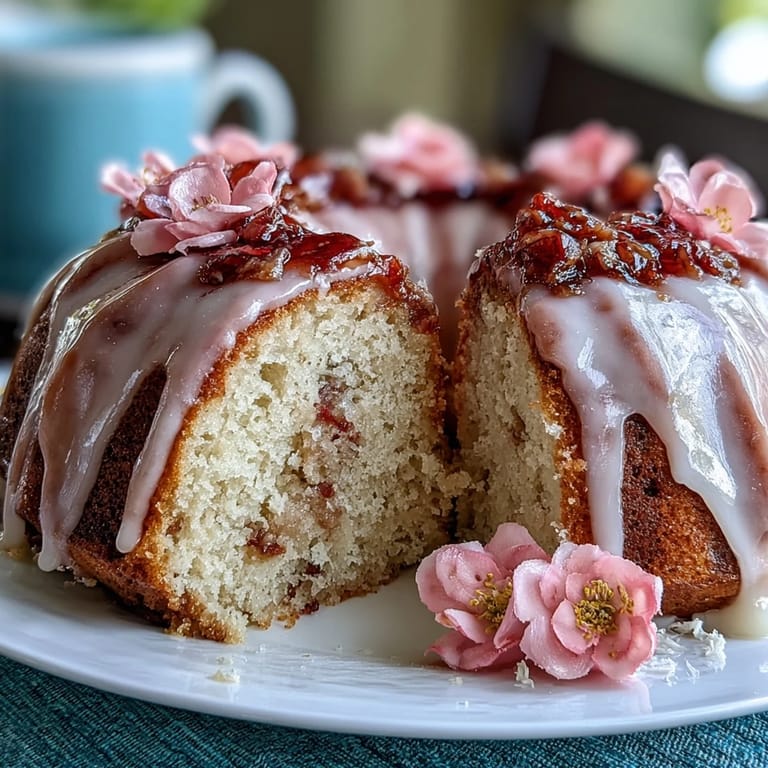
 Save to Pinterest
 I'll never forget my grandmother's face when she tasted the first slice at her birthday dinner—she closed her eyes, and I could tell she wasn't just enjoying cake, she was enjoying the moment someone had taken the time to layer and paint it just for her. That's what this recipe delivers.
Why Room Temperature Matters
When I first baked this cake, I used cold ingredients straight from the fridge because I was in a hurry. The batter separated, the crumb turned dense, and I learned the hardest way that shortcuts here backfire. Now I set out my butter and eggs the night before, and it takes maybe two minutes of extra planning for dramatically better results. Think of it as investing in your own success.
The Ombre Trick That Works
The ombre effect looks complicated, but it's really just a matter of layering three shades of pink strategically. Start with your darkest pink on the first cake layer (spread it thick), medium pink on the second layer (a little lighter), and light pink on top with white on the sides. As you smooth everything with an offset spatula, the colors naturally blend at the edges, creating that Instagram-worthy gradient. The magic isn't in precision; it's in letting the colors do the work for you.
- Use a bench scraper held vertically against the side of the cake to blend the ombre up the edges if you want an extra polished look.
- Work quickly because buttercream sets as it cools, so have your flowers ready to place before everything gets too firm.
- If a section looks too blotchy, just smooth it gently with a warm offset spatula, and the colors will meld.
 Save to Pinterest
 This cake has become my go-to gift when someone deserves to know they're celebrated—it's approachable enough to make on a Wednesday night but beautiful enough to feel like an occasion. That's really all you need.
Common Questions
- → How is the pink ombre effect created?
The buttercream is divided into portions and tinted with varying amounts of pink gel food coloring, then spread in layers from darkest to lightest to achieve the ombre gradient.
- → Can I use fresh flowers for decoration?
Fresh edible flowers like violets and pansies are ideal for decoration and should be added just before serving to maintain freshness and safety.
- → What type of flour is recommended for the sponge?
All-purpose flour ensures a tender crumb and good structure for the vanilla sponge layers.
- → How do I keep the cake moist?
Brushing cooled cake layers with simple syrup before frosting adds extra moisture and enhances flavor.
- → Is gel food coloring better than liquid for buttercream?
Gel food coloring provides vibrant colors without thinning the buttercream, preserving its smooth texture.