 Save to Pinterest
 My daughter pressed her nose against the bakery window every spring, mesmerized by the bunny cakes with their fluffy coconut fur and jelly bean tails. One Easter, instead of buying one, I decided we'd make it together in our kitchen. What started as a whimsical project turned into the kind of afternoon where flour dusted everything, giggles echoed through the house, and somehow we created something that looked almost as good as those bakery versions—and tasted infinitely better because we'd built it with our own hands.
I've learned that bunny cakes have this magical ability to make people smile before they even taste them. At my cousin's Easter brunch last year, watching a grown man's face light up when he saw this fluffy bunny sitting on the dessert table reminded me why we bake things that aren't just delicious—they're memorable.
Ingredients
- All-purpose flour (2 1/2 cups): The foundation of a tender, fine-crumbed cake that holds its shape when you're carving it into bunny parts.
- Baking powder and baking soda (2 1/2 tsp and 1/2 tsp): This combination gives you that light, pillowy texture without the cake rising so aggressively it cracks when you're shaping.
- Unsalted butter (1 cup for cake, 1 cup for frosting): Use softened butter—cold butter will fight you during creaming and throw off your whole timeline.
- Granulated sugar (1 3/4 cups): Don't skip the creaming step; those few minutes of beating sugar and butter together is what makes the cake tender and forgiving.
- Eggs (4 large, room temperature): Cold eggs won't incorporate smoothly and can make your batter grainy; let them sit on the counter for 20 minutes while your oven preheats.
- Vanilla extract (1 tbsp for cake, 2 tsp for frosting): Pure vanilla is worth the splurge here—it's the subtle flavor that makes people ask if there's something special in the batter.
- Whole milk (1 cup): The alternating addition method with flour keeps the batter smooth and prevents overmixing, which would make your cake tough.
- Powdered sugar (4 cups, sifted): Sifting removes lumps and aerates the frosting, making it easier to spread and lighter in texture.
- Sweetened shredded coconut (2 cups): This is your bunny's fur, so toasted coconut looks more sophisticated, but unsweetened works if you prefer less sweetness.
- Jelly beans and chocolate chips: These are your detail work—don't skimp on quality or use rock-hard candy that's been sitting in a drawer for years.
Tired of Takeout? 🥡
Get 10 meals you can make faster than delivery arrives. Seriously.
One email. No spam. Unsubscribe anytime.
Instructions
- Preheat and prepare:
- Set your oven to 350°F and grease those pans well—coconut oil works beautifully here if you have it. Flouring the pans prevents any sticking that would ruin your careful shaping later.
- Combine dry ingredients:
- Whisk your flour, baking powder, baking soda, and salt together in a medium bowl. This distributes the leavening evenly so you don't end up with dense pockets in your cake.
- Cream butter and sugar:
- Beat them together for 3-4 minutes until the mixture looks pale and fluffy, like thick clouds. This is where the magic happens—you're incorporating air that will make your cake tender.
- Add eggs one at a time:
- Beat each egg in fully before adding the next one; rushing this step means your batter could separate and look curdled. It'll come together eventually, but patience here saves headaches.
- Alternate wet and dry:
- Start and end with flour, adding small batches and mixing gently. This prevents overmixing, which toughens the cake and ruins your best efforts at shaping.
- Divide and bake:
- Pour batter evenly into both pans and slide them into the oven for 30-35 minutes. A toothpick inserted near the center should come out clean or with just a crumb or two.
- Cool with intention:
- Let the cakes rest in their pans for 10 minutes—this helps them firm up enough to turn out without falling apart. Transfer to a wire rack to cool completely; a warm cake is a fragile cake when you're about to carve it.
- Make the frosting:
- Beat softened butter until it's pale and creamy, then gradually add powdered sugar to avoid a flour cloud situation. Add vanilla and milk a little at a time until you reach a consistency that spreads smoothly but holds its shape.
- Assemble the bunny body:
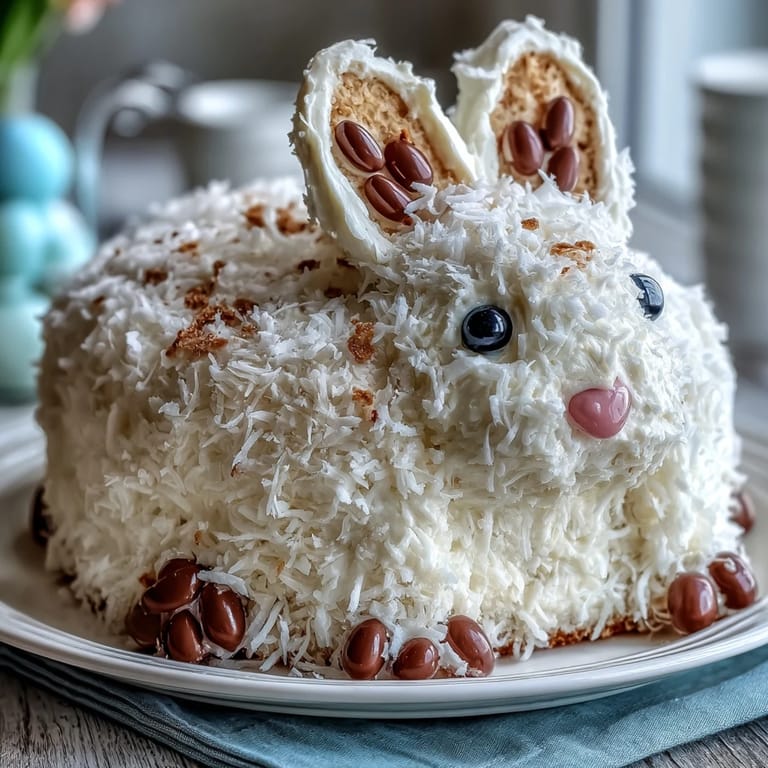
- Place one whole cake round on your serving platter as the bunny's body. Cut the second cake round in half and stand those semicircles upright at one end, creating the bunny's head and back.
- Shape ears and paws:
- From leftover cake scraps or the edges, carve out two long ear shapes and four small paw shapes using a serrated knife or just by eyeballing it. Attach everything to the body using frosting as your edible glue.
- Frost everything:
- Apply a generous, even layer of frosting all over the bunny shape. You want enough frosting to act as an adhesive for the coconut and to smooth out any imperfections in your carving.
- Add the coconut fur:
- Press shredded coconut onto the frosting, working in sections and patting gently so it sticks without compressing the frosting too much. Step back occasionally to see if you've missed any spots.
- Decorate with personality:
- Press a pink jelly bean at the back for the tail, add white and pink jelly beans to the paws as pads, and position chocolate chips or black jelly beans for eyes. If you want to tint some coconut pink for ear details, mix food coloring into dry coconut gradually until you reach the shade you want.
- Chill before serving:
- Give the cake at least 30 minutes in the refrigerator so the frosting sets and everything stays in place when you slice it.
 Save to Pinterest
 There's something about watching someone's face light up when they realize a cake is shaped like a bunny that makes all the carving and frosting worth it. It's not just dessert—it's a moment, a story they'll retell.
Shaping Without Fear
The first time I made this, I was convinced the whole thing would collapse into a messy puddle of frosting and cake crumbs. The truth is, cakes are more forgiving than you think, especially when frosting is involved. That frosting is your friend—it hides imperfect cuts, holds everything together, and honestly, if a piece breaks off, you just cover it with more frosting and coconut.
The Decorating Part Matters
I've made this cake three times now, and each version looks different, but they've all been delightful. The jelly beans become the bunny's personality—white paws, a pink tail, chocolate eyes that somehow make the whole thing adorable. Don't stress about making it Instagram-perfect; the imperfection is exactly what makes homemade bakes special.
Make It Your Own
This is your canvas, and you can twist it however you want. Some years I use lemon extract in the cake for brightness, other times almond extract for something more spring-like. The coconut is warm and sweet, but honestly, you could use tinted buttercream piped on instead if you want to avoid coconut entirely.
- If you're short on time, swap in a quality cake mix and store-bought frosting—nobody needs to know, and you've freed up an hour to focus on the fun decorating part.
- A gluten-free all-purpose flour blend works beautifully here as a 1:1 substitute if you're baking for someone with dietary restrictions.
- Chill the assembled cake overnight if you made it a day early; it actually helps everything set and hold together better when you slice it.
 Save to Pinterest
 This bunny cake is the kind of dessert that creates memories, whether it's perfect or charmingly wonky. Bake it, decorate it with joy, and watch it become the thing people talk about long after Easter ends.
Common Questions
- → How is the bunny shape formed?
Using two round cakes, one is cut in half to create ears and paws which are attached with frosting to form the bunny shape.
- → What gives the cake its fluffy fur appearance?
Sweetened shredded coconut is pressed onto the frosted cake to resemble soft, fluffy fur.
- → Can I add flavor variations to the batter?
Yes, adding lemon or almond extract enhances the cake's flavor profile without changing texture.
- → What decorations create the bunny's features?
Jelly beans form the tail and paw pads, while mini chocolate chips or black jelly beans serve as eyes.
- → Are there alternatives for a quicker preparation?
Store-bought cake mix and frosting can be used for a faster version without losing much charm.
- → How should this dessert be served?
Chill the decorated cake until serving. It pairs nicely with a cold glass of milk or herbal tea.