 Save to Pinterest
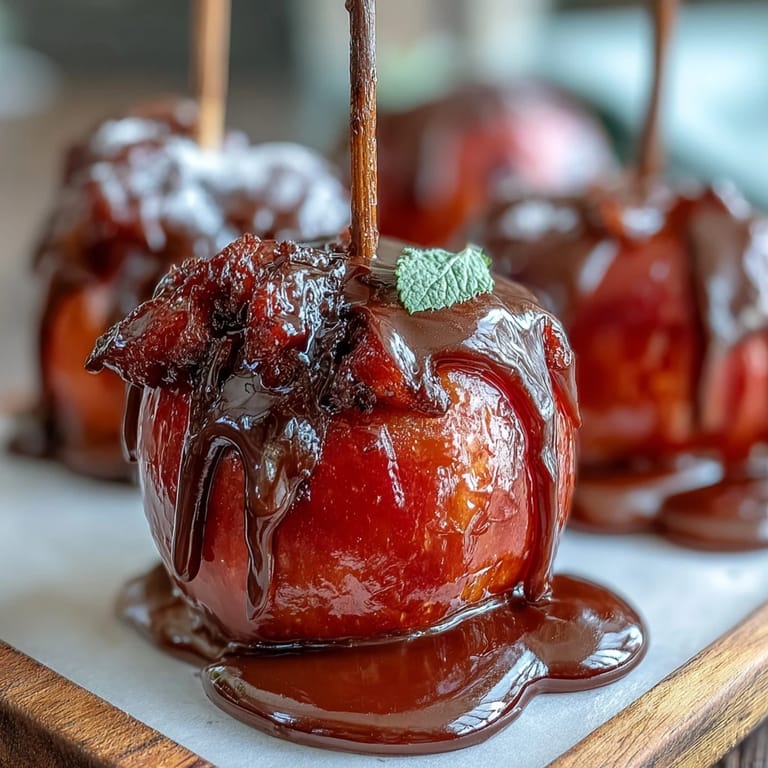
 My mom used to make candy apples every October, and I'd stand on a kitchen stool watching the sugar mixture turn from clear to amber, mesmerized by how something so simple could transform into pure magic on a stick. Years later, I realized the real trick wasn't the nostalgia—it was respecting the thermometer and moving fast once that candy hit hard-crack stage. There's something wonderfully unforgiving about candy work that keeps you present, focused, and honest about your technique. When you nail it, you get that satisfying crack when you bite through the shell, revealing the tart apple underneath. It's a dessert that feels both homemade and special, which is exactly why people still ask for them.
I made a batch of these for a Halloween party once, and watching kids—and honestly, the adults—carefully gnaw through that candy shell was its own kind of entertainment. Someone asked if they were hard to make, and I realized that's when I stopped being nervous about candy thermometers and started actually enjoying the process. The confidence came from understanding that the temperature mattered more than perfection, and the white chocolate drizzle was really just a beautiful way to say you cared.
Ingredients
- Granny Smith or Gala apples: Granny Smiths are tarter and hold up beautifully to the hot candy, but Galas give you sweeter bites if that's your preference—wash and dry them completely or the candy won't cling properly.
- Wooden sticks: Popsicle sticks or craft sticks work equally well; insert them firmly into the stem end before you start so they don't wiggle free during dipping.
- Granulated sugar: This is your base, combined with corn syrup to create that glossy, hard shell.
- Light corn syrup: It prevents crystallization and keeps your candy smooth and shiny—don't skip it.
- Water: Dissolves the sugar initially; the amount matters for hitting the right temperature.
- Red gel or liquid food coloring: Gel gives deeper color without thinning the mixture like liquid food coloring can, but either works if you're mindful.
- Cream of tartar: Optional but genuinely helpful for preventing graininess—it's a small thing that made the difference for me.
- White chocolate: Chop it yourself or use chips; the quality affects the drizzle's flavor, so use something you actually enjoy eating.
- Coconut oil or vegetable oil: Optional, but a tiny bit thins the white chocolate just enough for a beautiful drizzle without making it greasy.
Tired of Takeout? 🥡
Get 10 meals you can make faster than delivery arrives. Seriously.
One email. No spam. Unsubscribe anytime.
Instructions
- Set up your station:
- Line a baking sheet with parchment paper and lightly grease it so apples won't stick. Insert a wooden stick firmly into the stem end of each apple—this is your handle and it needs to be secure.
- Combine your candy base:
- In a heavy-bottomed saucepan, combine sugar, corn syrup, water, and cream of tartar if using. Stir gently just to combine everything; you want the mixture to look wet and unified, but you're not trying to be fancy about it.
- Heat without stirring:
- Start the boil:
- Set the saucepan over medium heat and attach a candy thermometer to the side. Let it come to a boil without stirring further—this prevents crystallization and keeps your candy smooth.
- Add the color:
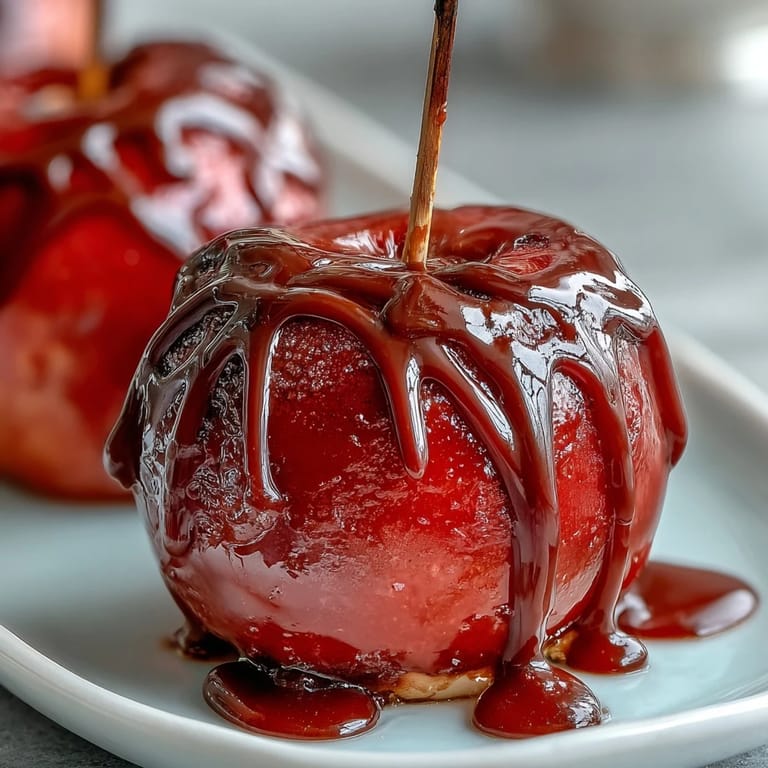
- Once the mixture reaches 250°F (121°C), add your red food coloring. Gently swirl the pan to distribute color, but resist the urge to stir; you're keeping things moving just enough to blend.
- Reach hard-crack stage:
- Continue boiling until the candy reaches 300°F (149°C)—this is the magic number where the candy becomes that satisfying hard shell. Watch it carefully because the last few degrees happen faster than you'd expect, and you'll know it's ready when it smells slightly nutty and looks deep amber.
- Dip with speed and care:
- Immediately remove from heat and work quickly. Tilt the pan slightly, grab an apple by its stick, and dip it into the hot candy, turning to coat evenly. Let excess drip back into the pan for a second or two, then place it on your prepared baking sheet—if you hesitate, the candy sets on the stick and gets lumpy.
- Let the coating set:
- Give the apples about 10 minutes to cool completely; the candy will go from glossy liquid to that satisfying brittle shell.
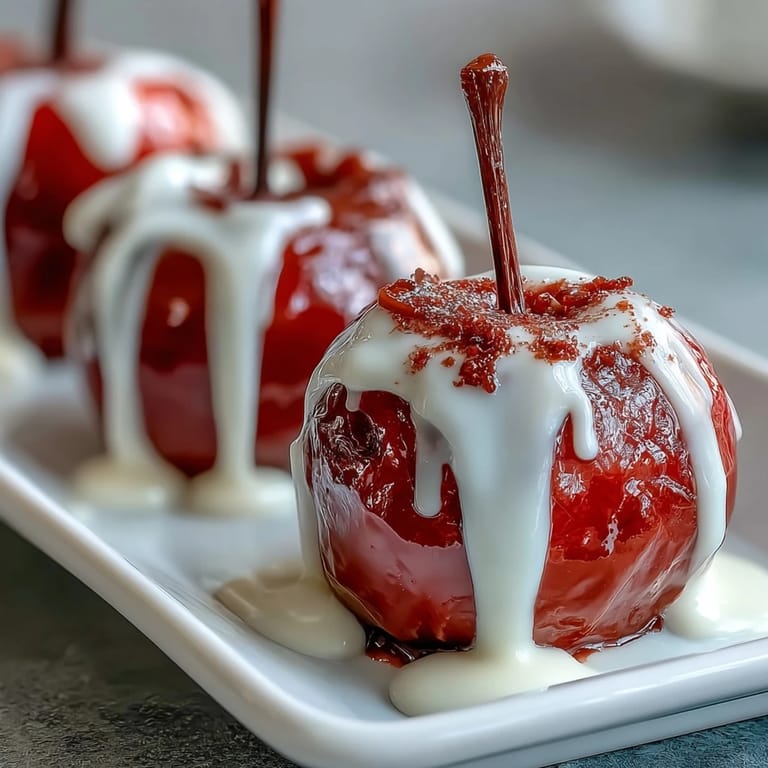
- Melt white chocolate:
- In a microwave-safe bowl, combine chopped white chocolate and coconut oil if using. Microwave in 20-second bursts, stirring between each burst until smooth and pourable—overheating white chocolate turns it grainy and sad.
- Drizzle and finish:
- Using a spoon or piping bag, drizzle white chocolate over each cooled candy apple in whatever pattern feels right. Let set for 10 minutes and you're done.
 Save to Pinterest
 There's a moment when you bite into a candy apple and that first crunch breaks the tension of the hard shell, revealing the crisp, cool apple underneath—and suddenly the whole thing makes sense. It's the reason this simple recipe has lasted generations.
Variations and Flavor Swaps
The beautiful thing about candy apples is that the base technique is solid enough to play with. I've experimented with different food coloring shades—green for an almost sinister look, gold for elegance—and the process stays exactly the same. The white chocolate drizzle is the perfect neutral canvas, but melted dark chocolate works beautifully if you want contrast, and honestly, a sprinkle of fleur de sel on wet candy is a game-changer if you want to get fancy.
Troubleshooting Common Issues
If your candy coating comes out grainy or crystallized, the culprit is usually stirring after the mixture starts boiling or tiny crystals sneaking in from used utensils—next time, use fresh utensils and trust the process. If the candy feels soft or sticky instead of hard, you didn't reach 300°F, so a candy thermometer becomes your non-negotiable tool. If the white chocolate drizzle hardens immediately and won't flow, your bowl wasn't warm enough or the chocolate cooled too much; a few more seconds in the microwave fixes it.
Storage and Make-Ahead Tips
Candy apples are best eaten the day you make them, while the apple is still crisp and the candy still has that satisfying snap. If you're making them ahead, store them in a cool place (not the fridge, which makes the apple sweat and the candy weep) and eat within 24 hours for best results.
- Keep them in a dry spot away from humidity, which softens the candy coating.
- You can make the candy coating up to a day ahead and store it in an airtight container, then quickly reheat it gently before dipping.
- The white chocolate drizzle is best applied shortly before serving so it stays bright and doesn't get sticky from condensation.
 Save to Pinterest
 Making candy apples teaches you something quiet about patience and precision—and the payoff is a treat that feels handmade and genuine. That's worth every careful degree on the thermometer.
Common Questions
- → What type of apples work best for candy coating?
Firm and tart varieties like Granny Smith or Gala are ideal as they hold up well to dipping and balance the sweetness.
- → How do I know when the candy coating is ready?
Use a candy thermometer and remove from heat when the mixture reaches about 300°F (hard crack stage) for a crisp shell.
- → Can I use other chocolates for the drizzle?
Yes, white chocolate works best here, but a dairy-free or vegan alternative can also be melted smooth and drizzled.
- → How should apples be prepared before dipping?
Apples must be washed, dried thoroughly, and have sticks inserted firmly for easier dipping and handling.
- → What’s the best technique for an even candy coating?
Dip apples quickly and steadily into the hot candy, turning gently to cover all sides, then allow excess to drip off evenly.